Bài viết hướng dẫn cài đặt vmware_exporter để giám sát máy chủ VMware ESXi bằng Prometheus và Grafana.
Cài đặt vmware_exporter trên ubuntu.
Các bước triển khai:
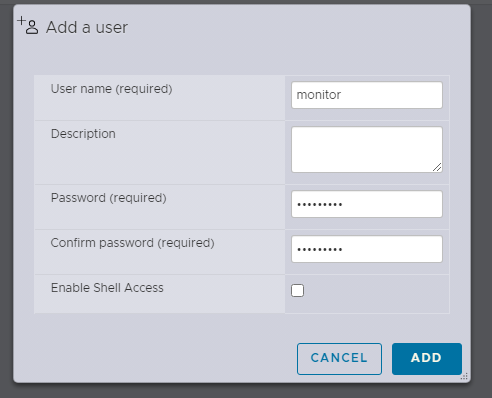
Trước khi cài đặt vmware_exporter, để đảm bảo an toàn cần tạo tài khoản monitor (Read-Only) trên máy chủ Esxi, các bước thực hiện như sau:
Đăng nhập vào ESXi qua trình duyệt, ở phần Host > Chọn Manage > Security & users > Users > Add user
Chọn lại Host > Actions > Permissions
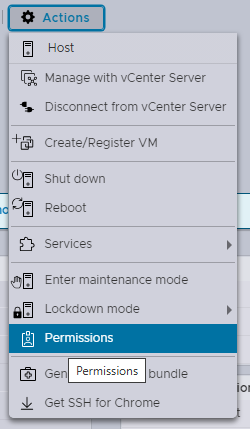
Chọn user monitor > Read-only > Add user
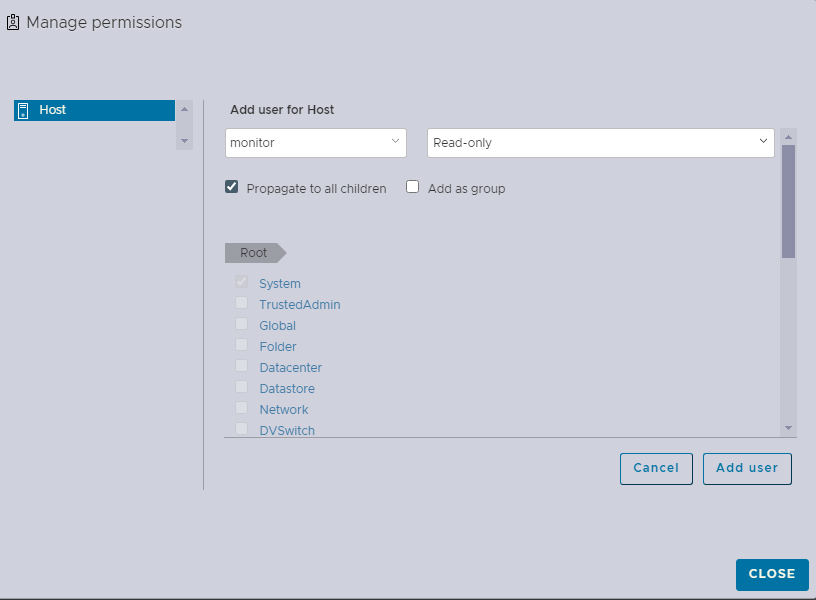
Như vậy là đã tạo xong user monitor.
Cài đặt các công cụ và thư viện cần thiết để chuẩn bị cho việc sử dụng vmware_exporter:
sudo apt update -y
sudo apt install python3 curl net-tools git wget python3-pip -y
Cài đặt thư viện PyYAML cho python 3, cho phép làm việc với dữ liệu YAML trong python:
sudo pip3 install --ignore-installed PyYAML
Cài đặt vmware_exporter qua pip3
pip3 install vmware_exporter
Tìm kiếm thư mục chứa file config của vmware_exporter bằng lệnh sau:
find / -name "vmware_exporter"

Sau khi đã có đường dẫn chứa file config của vmware_exporter, tiến hành cấu hình:
nano /home/hoangits/.local/lib/python3.12/site-packages/vmware_exporter/config.yml
Nội dung file:
default:
    vsphere_host: 10.0.150.10
    vsphere_user: 'monitor'
    vsphere_password: 'Abc@123'
    ignore_ssl: True
    specs_size: 5000
    fetch_custom_attributes: True
    fetch_tags: True
    fetch_alarms: True
    collect_only:
        vms: True
        vmguests: True
        datastores: True
        hosts: True
        snapshots: True"
Dưới đây là mô tả ý nghĩa của các thông số trong cấu hình mẫu:
vsphere_host: Địa chỉ IP hoặc tên miền của máy chủ vSphere ESXi hoặc vCenter.vsphere_user: Tên người dùng để đăng nhập vào máy chủ vSphere.vsphere_password: Mật khẩu tương ứng với người dùng trên máy chủ vSphere.ignore_ssl: Có bỏ qua chứng chỉ SSL không. Nếu đặt làTrue, vmware_exporter sẽ bỏ qua các lỗi chứng chỉ SSL không hợp lệ.specs_size: Kích thước tối đa của các yêu cầu API khi lấy thông tin về máy ảo và máy chủ.fetch_custom_attributes: Xác định liệu có thu thập thông tin thuộc tính tùy chỉnh từ máy ảo không.fetch_tags: Xác định liệu có thu thập thông tin về nhãn từ máy ảo không.fetch_alarms: Xác định liệu có thu thập thông tin về cảnh báo từ máy chủ không.collect_only: Xác định các loại đối tượng sẽ được thu thập thông tin, bao gồmvms,vmguests,datastores,hosts, vàsnapshots.
Nếu có nhiều Esxi thì thêm nhiều đoạn cấu hình như trên, thay <default:> thành tên qui định cho mỗi ESXi.
Tạo service cho vmware_exporter để systemd quản lý:
sudo nano /etc/systemd/system/vmware_exporter.service
Nội dung file:
[Unit]
Description=VMWare Exporter
Wants=network-online.target
After=network-online.target

[Service]
User=hoangits
Group=hoangits
Type=simple
ExecStart=/usr/bin/python3 /home/hoangits/.local/bin/vmware_exporter -c /home/hoangits/.local/lib/python3.12/site-packages/vmware_exporter/config.yml
Restart=always

[Install]
WantedBy=multi-user.target
Cập nhật dịch vụ mới bằng lệnh systemctl daemon-reload sau đó khởi động vmware_exporter và bật tính năng tự khởi động theo OS cho nó.
sudo systemctl daemon-reload
sudo systemctl start vmware_exporter
sudo systemctl enable vmware_exporter
sudo systemctl status vmware_exporter
Kết quả như sau:

Kiểm tra xem port đã chạy chưa:
netstat -tlnp | grep 9272

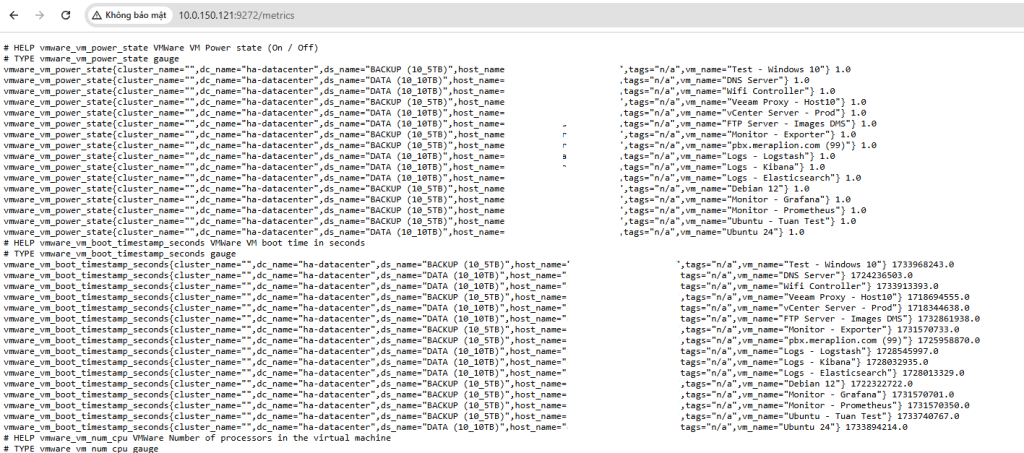
Truy cập URL của Host cùng port 9272 để kiểm tra: http://<ipaddr>:9272/metrics
Khai báo targer cho Prometheus để thu thập metrics từ vmware_exporter
sudo nano /etc/prometheus/prometheus.yml
Nội dung cấu hình:
  - job_name: 'ESXi10'
    metrics_path: '/metrics'
    static_configs:
      - targets:
        - 10.0.150.10
        labels:
         hostname: ESXi10
         device: VMWARE
    params:
      section: [default]
    relabel_configs:
      - source_labels: [__address__]
        target_label: __param_target
      - source_labels: [__param_target]
        target_label: instance
      - target_label: __address__
        replacement: 10.0.150.79:9272
      - source_labels: [hostname]
        target_label: host_name
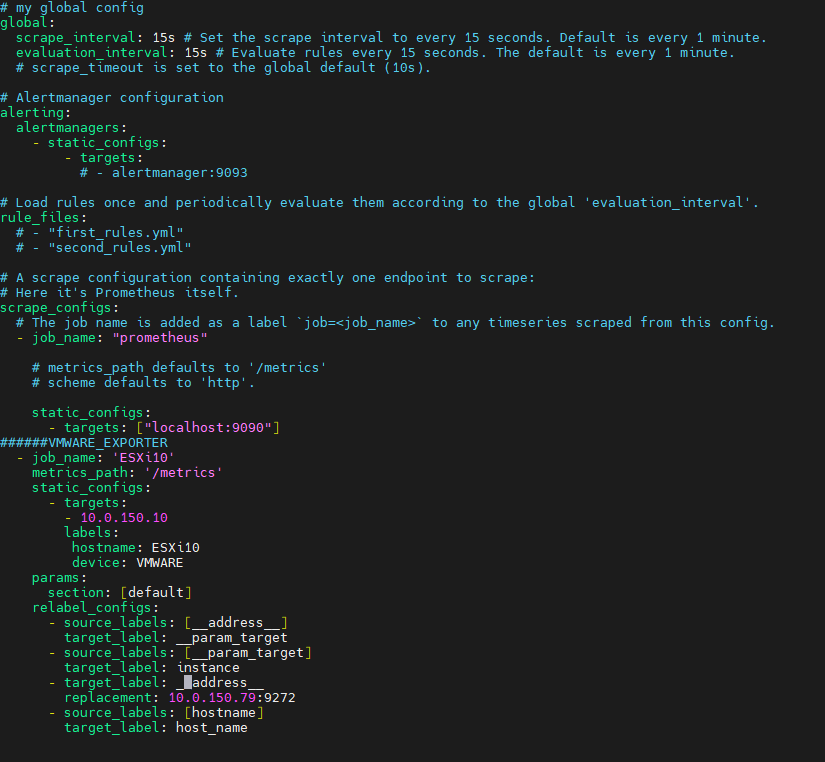
Khi có nhiều ESXi cần giám sát thì thêm nhiều job
Chạy lệnh kiểm tra tệp cấu hình Prometheus:
promtool check config /etc/prometheus/prometheus.yml

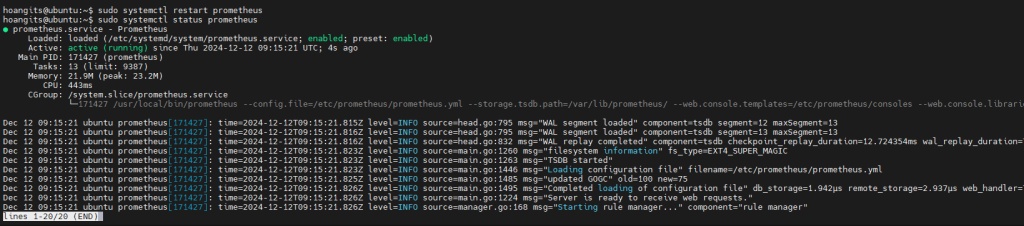
Khởi động lại và kiểm tra dịch vụ prometheus:
sudo systemctl restart prometheus
sudo systemctl status prometheus
Trên WebUI của prometheus, chọn Status > Target health
Thông tin target Vmware đã được hiển thị

Tiếp tục thêm Dashboard vào Grafana để giám sát. Có thể tự tạo Dashboard theo nhu cầu cần giám sát hoặc thêm dashboard có sẵn.
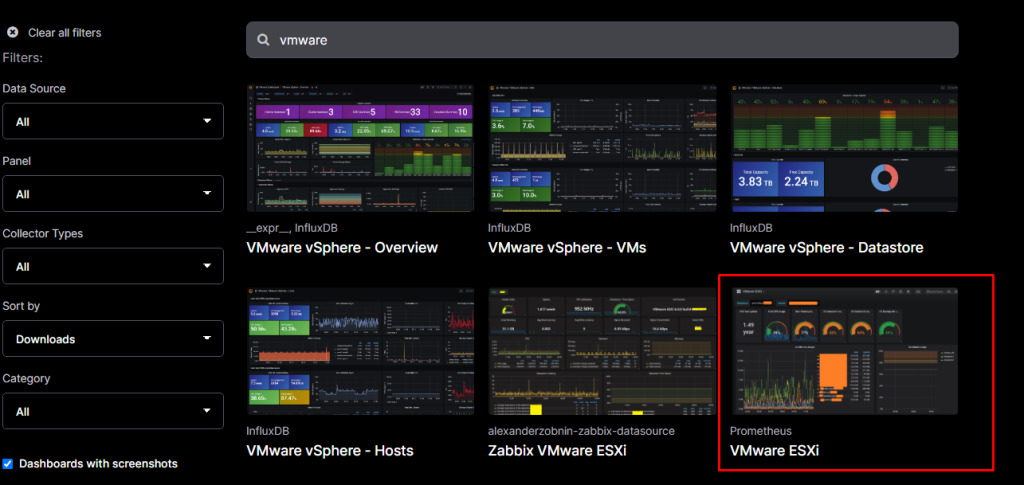
Truy cập trang https://grafana.com/grafana/dashboards/ và tìm dashboard cho vmware_exporter:
Mình tìm thấy 1 dashboard sử dụng data source cho Prometheus, chọn vào Dashboard > Tìm đến phần Get this dashboard > Copy ID to the clipboard
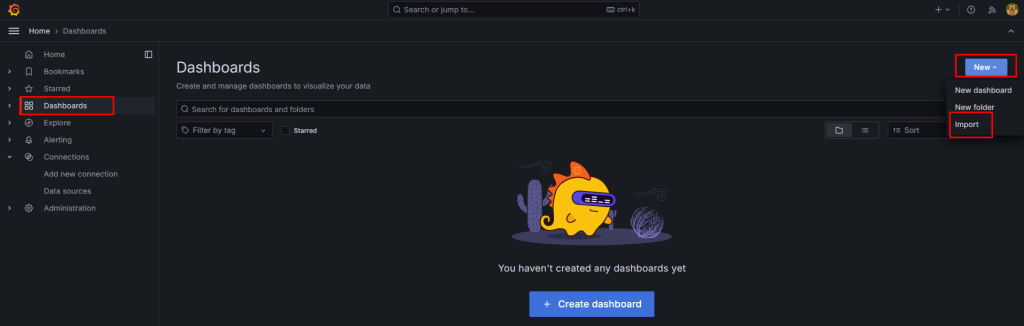
Truy cập vào Grafana http://<ipaddr>:3000
Chọn vào mục Dashboard > New > Import
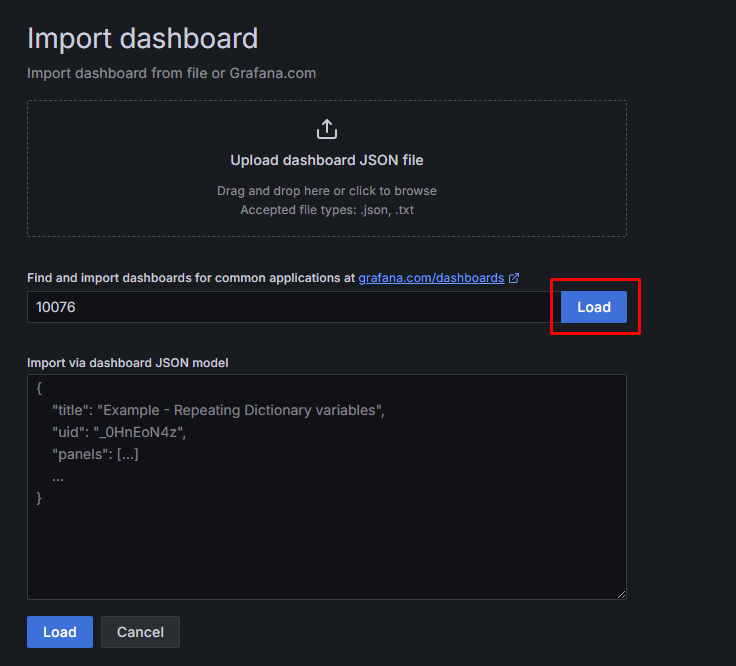
Paste ID vừa copy vào > Load
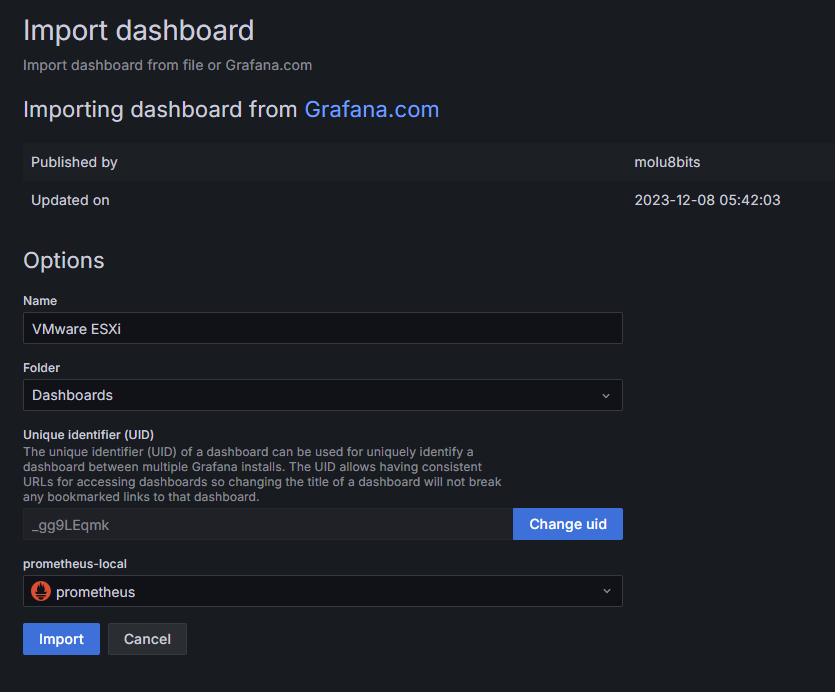
Đặt tên và chọn Datasource là Prometheus > Import
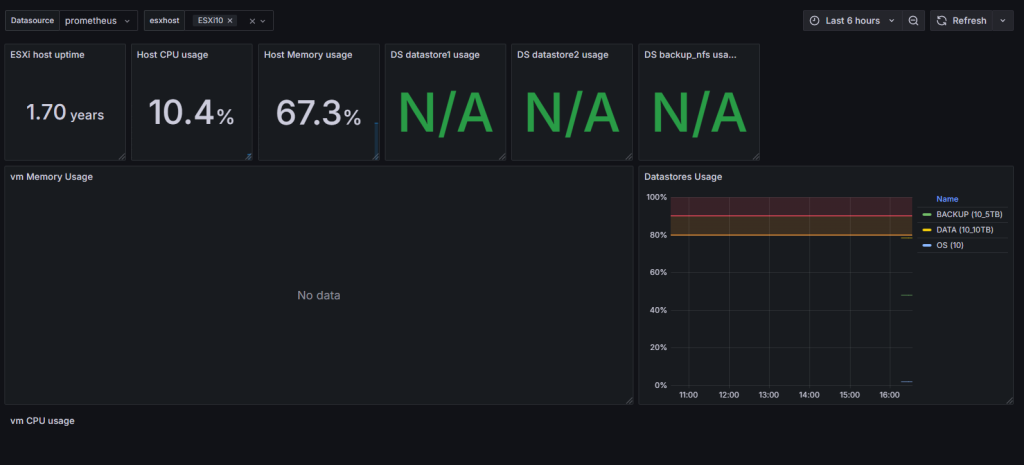
Đến đây chúng ta đã có cơ bản 1 Dashboard. Điều bạn cần làm là điều chỉnh lại các Query và metrics để có được Dashboard hoàn chỉnh.